We've launched our new site at www.openlighting.org. This wiki will remain and be updated with more technical information.
Difference between revisions of "IPad ArtNet Node"
From wiki.openlighting.org
(Added listing of the project’s top-level directory) |
m |
||
| Line 4: | Line 4: | ||
Prerequisites: libartnet 1.1.0, Mac OS X 10.6.8, Xcode 4.0.2, iPad w/ iOS 4.3 | Prerequisites: libartnet 1.1.0, Mac OS X 10.6.8, Xcode 4.0.2, iPad w/ iOS 4.3 | ||
| − | == Using libartnet in | + | == Using libartnet in Xcode == |
This is documentation of my first steps using libartnet and Xcode. I am still a complete newbie with all these things. However, I suceeded in running a simple program on the iPad sending and receiving Art-Net data – not without help from the excellent people of the open-ligthing ML<ref>http://groups.google.com/group/open-lighting/browse_thread/thread/e3f322613b710d9d/661d7e4babba4bf1</ref>. I tried to sum up here my experiences so far, although I am sure there are better ways to achieve the same result. | This is documentation of my first steps using libartnet and Xcode. I am still a complete newbie with all these things. However, I suceeded in running a simple program on the iPad sending and receiving Art-Net data – not without help from the excellent people of the open-ligthing ML<ref>http://groups.google.com/group/open-lighting/browse_thread/thread/e3f322613b710d9d/661d7e4babba4bf1</ref>. I tried to sum up here my experiences so far, although I am sure there are better ways to achieve the same result. | ||
Revision as of 11:59, 1 July 2011
Written by Tobi Schäfer, September 2010. Updated by Tobi Schäfer, July 2011.
Prerequisites: libartnet 1.1.0, Mac OS X 10.6.8, Xcode 4.0.2, iPad w/ iOS 4.3
Contents
Using libartnet in Xcode
This is documentation of my first steps using libartnet and Xcode. I am still a complete newbie with all these things. However, I suceeded in running a simple program on the iPad sending and receiving Art-Net data – not without help from the excellent people of the open-ligthing ML<ref>http://groups.google.com/group/open-lighting/browse_thread/thread/e3f322613b710d9d/661d7e4babba4bf1</ref>. I tried to sum up here my experiences so far, although I am sure there are better ways to achieve the same result.
Preparing libartnet
First, we download the libartnet sources and prepare them for inclusion in Xcode. We need to generate a file called config.h to make things work.
Using Tarball
$ curl -O http://code.google.com/p/linux-lighting/downloads/detail?name=libartnet-1.1.0.tar.gz
$ tar -xzf libartnet-1.1.0.tar.gz
$ cd libartnet-1.1.0/
$ ./configure
$ cp config.h artnet/
Using Git
$ git clone http://git.opendmx.net/libartnet
$ cd libartnet/
$ autoreconf -i
$ ./configure
$ cp config.h artnet/
Adding libartnet to Xcode
Create a directory called Vendor/artnet in the Xcode project directory – in the file system or Finder, not in the Xcode application; the latter will be done in the next step – and copy the source files from the artnet directory of the previous step into the new Vendor/artnet directory.
$ mkdir -p ~/test/Vendor/artnet
$ cp artnet/*.[ch] ~/test/Vendor/artnet
$ ls -l ~/test
total 0
drwxr-xr-x  10 tobi  tobi  340 Jul  1 17:20 ArtNetTest
drwxr-xr-x   5 tobi  tobi  170 Jul  1 21:17 ArtNetTest.xcodeproj
drwxr-xr-x   7 tobi  tobi  238 Jul  1 15:05 ArtNetTestTests
drwxr-xr-x   4 tobi  tobi  136 Jul  1 21:08 Vendor
$ ls -l ~/test/Vendor/artnet
total 352
-rw-r--r--  1 tobi  tobi  44082 Jul  1 20:52 artnet.c
-rw-r--r--  1 tobi  tobi  11580 Jul  1 20:52 artnet.h
-rw-r--r--  1 tobi  tobi   1987 Jul  1 20:52 common.h
-rw-r--r--  1 tobi  tobi   4831 Jul  1 20:52 config.h
-rw-r--r--  1 tobi  tobi   1754 Jul  1 20:52 misc.c
-rw-r--r--  1 tobi  tobi   1610 Jul  1 20:52 misc.h
-rw-r--r--  1 tobi  tobi  18941 Jul  1 20:52 network.c
-rw-r--r--  1 tobi  tobi   8495 Jul  1 20:52 packets.h
-rw-r--r--  1 tobi  tobi  13397 Jul  1 20:52 private.h
-rw-r--r--  1 tobi  tobi  27731 Jul  1 20:52 receive.c
-rw-r--r--  1 tobi  tobi   2806 Jul  1 20:52 tod.c
-rw-r--r--  1 tobi  tobi   1307 Jul  1 20:52 tod.h
-rw-r--r--  1 tobi  tobi  12364 Jul  1 20:52 transmit.c
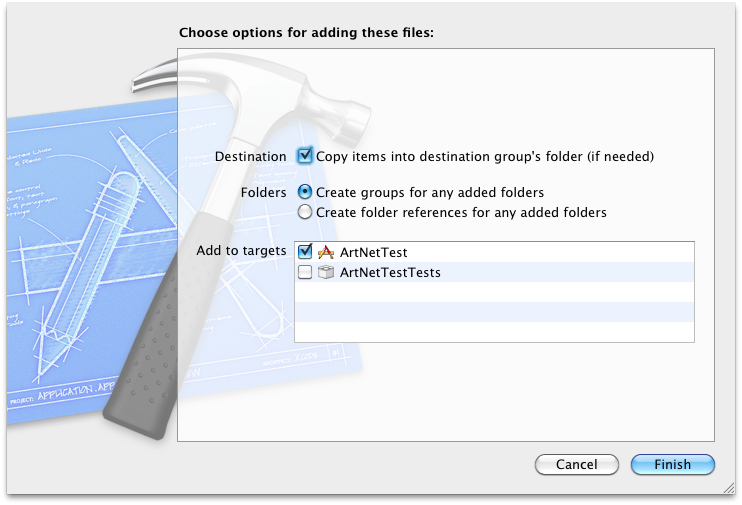
Now drag&drop the Vendor folder to the top level of the Xcode project and choose the following options for adding files.
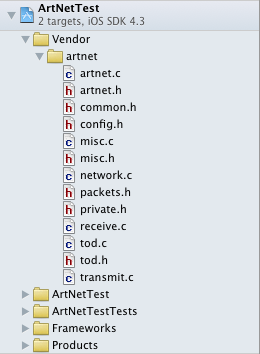
The structure of your project should look similar to this:
Add the path to the Vendor directory to the Header Search Paths in the Search Paths section of your build target and tick the recursive checkbox.<ref>http://iphone.olipion.com/cross-compilation/include-library-in-xcode-project</ref>
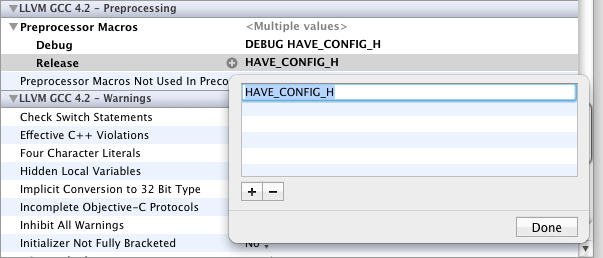
Finally. add the HAVE_CONFIG_H macro to the Preprocessor Macros section of your project’s build settings.
At this point your project should build and run without error – the libartnet source code will be compiled and linked automatically.
Example Code
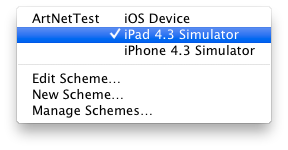
You now should be ready to build and run the following code in the Simulator as well as on the iPad. Thus, do not forget to select the corresponding setting from the Overview drop-down menu.
The code is just a proof of concept and not ready for production – actually it is pretty bad because it abuses the main method instead of creating its own controller. However, it reduces complexity and simply shows the basic approach to using libartnet from within Objective-C code.
The code creates and sets up an Art-Net node, defines a handler method for incoming data and then creates an infinite loop sending Art-Net polls and checking for Art-Net input.
#import "artnet.h"
#import "packets.h"

int artnetReceiver(artnet_node node, void *pp, void *d) {
       NSLog(@"Receiving Art-Net data!");
       artnet_packet pack = (artnet_packet) pp;
       printf("Received packet sequence %d\n", pack->data.admx.sequence);
       printf("Received packet type %d\n", pack->type);
       printf("Received packet data %s\n", pack->data.admx.data);
       return 0;
 }

int main(int argc, char *argv[]) {

       char *ip_addr = NULL;

       uint8_t subnet_addr = 0;
       uint8_t port_addr = 1;

       artnet_node *artnetNode = artnet_new(ip_addr, 1);

       if (!artnetNode) {
               printf("Error: %s\n", artnet_strerror());
               exit(-1);
       }

       artnet_set_long_name(artnetNode, "Art-Net Test");
       artnet_set_short_name(artnetNode, "ANT");

       // set the upper 4 bits of the universe address
       artnet_set_subnet_addr(artnetNode, subnet_addr) ;

       // enable port 0
       artnet_set_port_type(artnetNode, 0, ARTNET_ENABLE_OUTPUT, ARTNET_PORT_DMX) ;

       // bind port 0 to universe 1
       artnet_set_port_addr(artnetNode, 0, ARTNET_OUTPUT_PORT, port_addr);

       artnet_dump_config(artnetNode);

       artnet_set_handler(artnetNode, ARTNET_RECV_HANDLER, artnetReceiver, NULL);

       if (artnet_start(artnetNode) != 0) {
               printf("Error: %s\n", artnet_strerror());
               exit(-1);
       }

       while (YES) {
               artnet_send_poll(artnetNode, NULL, ARTNET_TTM_DEFAULT);
               //printf("arnet_get_sd() => %i\n", artnet_get_sd(artnetNode));
               printf("artnet_read() => %i\n", artnet_read(artnetNode, 1));
       }

       // Use this to deallocate memory
       //artnet_stop(artnetNode);
       //artnet_destroy(artnetNode);

   return 0;
}
Testing Data Transmission
If your program builds and runs without errors you now can test whether Art-Net data is sent and received. Wireshark<ref>http://www.wireshark.org</ref> is a handy tool for monitoring your network.
However, for sending Art-Net data you will need a more appropriate tool. I am using the OLA Command Line Tools, running them from another machine with GNU/Linux (Ubuntu 10.04) as operating system.
Although I did not test it, you probably can also install OLA on another Mac or even the same machine you are running XCode on, using the OLA MacPorts port and/or following the steps of the OLA On Mac OS X page.
Installing OLA On Ubuntu
Please refer to the OLA On Linux page.
If you should get the following error try to fix it with one of two available solutions:
Rpc.pb.cc: In copy constructor 'ola::rpc::RpcMessage::RpcMessage(const ola::rpc::RpcMessage&)':
Rpc.pb.cc:143: error: base class 'class google::protobuf::Message' should be explicitly initialized in the copy constructor
A similar error can occur when building the ola-examples package:
g++ -DHAVE_CONFIG_H -I. -I..    -Wall -Werror -I/usr/local/include/
libola   -g -O2 -MT ola-dmxconsole.o -MD -MP -MF .deps/ola-
dmxconsole.Tpo -c -o ola-dmxconsole.o ola-dmxconsole.cpp
cc1plus: warnings being treated as errors
ola-dmxconsole.cpp: In function ‘void mask()’:
ola-dmxconsole.cpp:150: error: value computed is not used
ola-dmxconsole.cpp:156: error: value computed is not used
ola-dmxconsole.cpp: In function ‘void values()’:
ola-dmxconsole.cpp:184: error: value computed is not used
ola-dmxconsole.cpp:188: error: value computed is not used
ola-dmxconsole.cpp:190: error: value computed is not used
ola-dmxconsole.cpp:194: error: value computed is not used
ola-dmxconsole.cpp:197: error: value computed is not used
ola-dmxconsole.cpp:202: error: value computed is not used
ola-dmxconsole.cpp:205: error: value computed is not used
ola-dmxconsole.cpp:208: error: value computed is not used
ola-dmxconsole.cpp:215: error: value computed is not used
ola-dmxconsole.cpp:225: error: value computed is not used
ola-dmxconsole.cpp:226: error: value computed is not used
ola-dmxconsole.cpp:227: error: value computed is not used
make[2]: *** [ola-dmxconsole.o] Error 1
You should be able to prevent this by editing ./src/Makefile.am, removing -Werror and then running autoreconfig && ./configure again.<ref>http://groups.google.com/group/open-lighting/msg/c6d86d03dd74ed5b</ref>
Patching An Art-Net Node
To make the Ubuntu machine act as an Art-Net node first start the OLA daemon with a debug level of 3:
olad -l 3
Then patch the machine for Art-Net output in universe 1 on port 0:
ola_patch -d 1 -p 0 -u 1
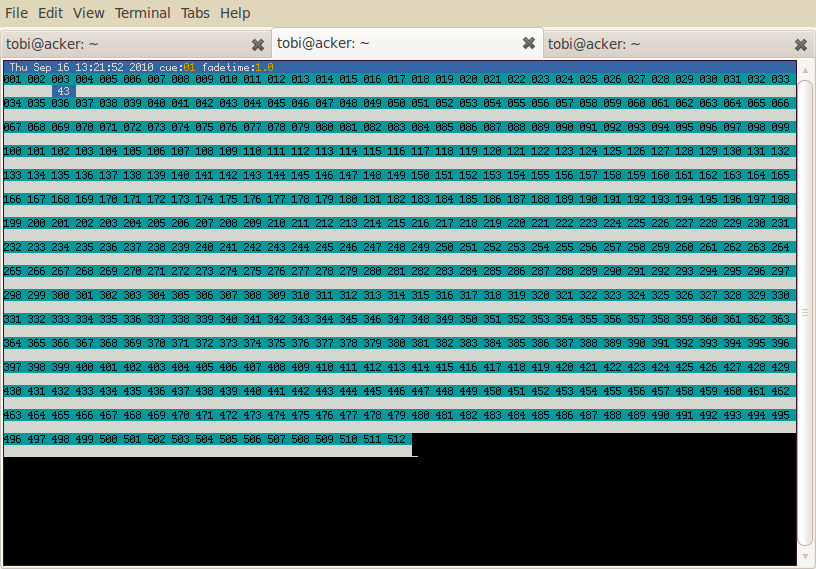
Now start ola_dmxconsole for sending some Art-Net data in universe 1:
ola_dmxconsole -u 1
If you run the Art-Net project in Xcode (either with the Simulator or on the iPad) and open the Xcode console window you should see log messages according to your actions in the DMX console.
E.g. try to navigate to a channel with the left and right cursor keys and then increase or decrease the value with the scroll up/down keys.
Sources
<references/>
